An Arduino-based programmer for the AT89C2051 chip – part 2

Part 1

Here’s the software necessary to work the programmer board:

Arduino sketch (for Arduino Mega 2560)

PC program See also part 3 with a Python program that runs under Linux

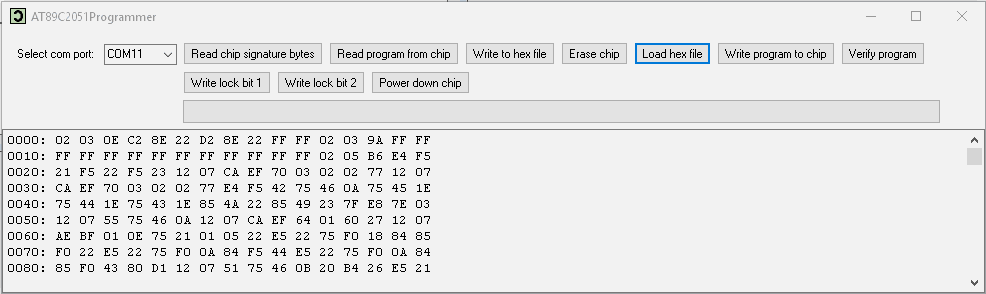
Here’s a screenshot of the program in operation.  It should all be fairly self-explanatory.  Please send me a comment if you have any problems or questions.

89C2051screenshot

Update January 2024. Fixed a slight bug in the Arduino sketch. It only affected the reading of the chip when lock bit 2 (verify disabled) was set. When the lock bit is set, the program cannot be read out of the chip, and when a byte is read, the P1 outputs of the chip just float (high impedance state). After the update, the Arduino sets its pins connected to P1 in the INPUT_PULLUP mode when reading – so in the lock bit set case, all the bytes will read as 0xFF and the chip will be reported to appear empty. Previously, depending on what operations had been carried out before reading, the Arduino inputs could have been in INPUT, rather than INPUT_PULLUP mode – this gave inconsistent readings, usually 0xFE or 0xFC. Anyway, now fixed.

Update January 2021. Thanks to Marco Almeida, who built one of these gadgets, and reported errors when reading a program from the Chip. He solved the problem by reducing the baud rate at which the Arduino communicates with the PC program – previously it was 57600, and Marco reported that he’d had success at 9600. I was able to reproduce the bug at 57600 baud. I don’t know why it worked previously – I think maybe an update to the Arduino release, default optimization settings, etc, pushed it over the edge. Anyway, I found that mine worked reliably at 19200 baud, so I’ve now modified and uploaded both the Arduino Mega sketch, and the PC program to work at that new reduced speed. It’s still plenty fast enough, only taking a couple of seconds to write, read, or verify a program using all the AT89C2051’s flash memory. The download links haven’t changed, but if you installed the programs prior to January 2021, you should probably uninstall your old copy, and update to the current one.

To reliably program a chip, you need to use the Erase function first. I usually erase, then read the chip (to check it’s empty), then load the hex file, write it to the chip, verify, and power down. Very occasionally, I’ll get a verify error, but a second pass through the above sequence has always resulted in success, so far!

You can buy programmers for the AT89C2051 (and other similar chips) on AliExpress for less than twenty dollars, and if you just want to program chips, that’s an easier way to go!


Posted

in

,

by

Tags:

Comments

25 responses to “An Arduino-based programmer for the AT89C2051 chip – part 2”

  1. borya avatar
    borya

    Hi.
    I need a flash AT89C2051 controller for the stereo system. I want to repeat your programmer. Tell me, please, can I replace the transistor BC337 to transistor BC817?

    thanks!
    regard, B

    1. ceptimus avatar
      ceptimus

      Hi borya

      Yes, the BC817 will work well. You can use any general purpose NPN transistors for this project.

  2. borya avatar
    borya

    Thank you. I will try

  3. natraj avatar
    natraj

    Can you send me analog propeller clock source code and circuit diagram using arduino through mail

    1. ceptimus avatar
      ceptimus

      Hi natraj,

      There is a link to download the source code on the page ‘POV source code – part 2’. Here’s a copy of the link:

      http://ceptimus.co.uk/POVclockMain.c

      If you click on that it might just display the source in a window, but you should be able to right-click and ‘save as…’

      All the source is in that one file.

      The YouTube video shows how to connect the Arduino: https://youtu.be/Xy8lKjUCEk8

      Look in the description of that video and there are some links to download the Arduino sketch.

  4. Daniel Denis avatar
    Daniel Denis

    Hi ceptimus, can you send me the PC program source code please… Thanks

    1. ceptimus avatar
      ceptimus

      Hi Daniel

      I never really intended to publish the source code, so it’s not as well structured or well commented as it should be, but here you go.

      PC program source code for AT89C2051Programmer

  5. cesco avatar
    cesco

    Cant make this work reliably. I can read and i can erase “sometimes” but not always. I cannot read signature, i cannot program the chip. The PC program seems quite flaky.

    1. ceptimus avatar
      ceptimus

      Have you measured the voltages produced by the charge pump and the zenner / transistor circuit? Mine seems to work 100% reliable – sorry that you’re having problems with your version.

  6. cesco avatar
    cesco

    I do use external 12V source. I do manually switch from 12V to 5V and back. Only 2 resistor and 1 transistor. The hardware works, i can program the chip.

    I did simplyfy the code and send commands / data with a terminal program now. This works reliably. I use hex2bin to convert the hex to binary, then hterm “send file” to upload the data.

    I think the PC app has some problems.

    1. Vasile avatar
      Vasile

      Thank you very much Ceptimus, works perfectly.

    2. San Zamoyski avatar

      Hi Cesco!
      I was thinking if setting RST to GND is necessary. Do You use only 5V and 12V, without ever setting RST to GND? I’m going to use nano as programmer, so I need to modify somehow ino.
      Can You describe in details how to send binary with some terminal software? Or Your modified ino file.
      I’m working on linux, so PC program won’t propably work…

      Regards!

  7. borya avatar
    borya

    Hi, ceptimus!
    I assembled the programmer according to Your circuit. It seems to be working. I can read the signatures, I can read the controller’s memory (but it’s empty). When I try to download the firmware into the program, I get an error “Line 1 of file does not start with a colon”.
    Can You help me?

    1. borya avatar
      borya

      I think the problem is one hundred firmware in the BIN format. I downloaded the converter, converted it to HEX. Uploaded it to the program. But got the error “hex file extends beyond memory size (2048 bytes)”
      Took another file that weighs 2kB, first was 3kB. converted it to HEX, uploaded to the program. good, there is no error.
      Write it to the chip. Then I read the chip. And I see discrepancies. The FF structures are listed as 7F, there are still discrepancies. Tell me, what’s wrong? Where I was mistaken?

  8. borya avatar
    borya

    I compared two files. There are a lot of mistakes. I can attach the result of the comparison

    1. ceptimus avatar
      ceptimus

      Hi borya,

      If something is being written to the chip, but some bits are missing (e.g. 7F instead of FF), then I would first check the programming voltage while the chip is being programmed. Do you have a voltmeter? The circuit has to provide 5V and 0V to the chip when it is being read normally – and then 12V while programming. The diode capacitor circuit driven by the two Arduino pins should generate more than that – maybe 15V or so – as long as it’s more than 12V that’s fine as the zener diode then regulates it down to 12V. Try to erase the chip back to blank (or use another one if you have one) and try again. If you want to email me the two files, I can try to compare them and see if I can work out what might be going wrong. You can email to ceptimus@ceptimus.co.uk

      If it’s not the programming voltage, another problem might be a bad connection or short on the pins connecting from the twin row of I/O on the Arduino Mega to the pins on the chip. If you disconnect your board from the Arduino and also remove the chip from the programming socket, then you should carefully check that all the connections are as they should be and you don’t have any accidental shorts between adjacent pins.

  9. borya avatar
    borya

    ceptimus, thanks for your reply.
    I wrote to you email

  10. Bogdan avatar
    Bogdan

    hi, I ‘ve maked your programmer but is not giving 12v on reset pin.
    can you help me?

    1. ceptimus avatar
      ceptimus

      Yes, I’ll try. Do you have any sort of oscilloscope available? Or maybe a multimeter that can show frequency as well as volts, etc.?

  11. Shanjaq avatar
    Shanjaq

    Hi, is the Arduino sketch compatible with Arduino Uno or Diecimila or similar “normal” Arduino? I have a ModernDevices RBBB based on ATMega328, and I’m not sure why all parallel programmers I’ve found use the Arduino Mega? Thanks!

    1. ceptimus avatar
      ceptimus

      It’s just that the Mega328 Arduinos don’t have enough free pins to connect to all the pins on the AT89C2051 and still have pins to drive the voltage multiplier and select the programming voltage. Remember that you have to leave pins 0 and 1 free for serial communication with the PC. It is just about possible to get a 328 to do the job as not every pin on the AT89C2051 is needed for programming, and some of the Arduino’s pins could be used for more than one function. It’s a lot easier to do with a Mega 2560, and the layout of the double-row of I/O pins on the 2560 board makes routing the connections to the target AT89C2051 easier.

  12. PANKAJ MAHENDRA PANDIT avatar
    PANKAJ MAHENDRA PANDIT

    Hello sir,
    Thanks for giving us solution for AT89C2051.
    I got one error while uploading hex file, while loading simple hex file it shows error that, Hex file extends beyond memory. But hex file which I trying to upload was blinking led.

  13. LuWi avatar
    LuWi

    This is super. I made little changes for UNO and it works fine!

  14. vik avatar
    vik

    This horror is pumped with 12 volts. Why is it not possible to have a second power supply for 12 and control via a transistor switch from an Arduino pin?
    I also don’t understand what Python does. Well, if the sketch is already loaded into the IDE, then why use Python?

    1. ceptimus avatar

      Certainly you can use a 12V supply if you have one available. There is already a transistor that switches the 12V in my design – it’s just that the 12V comes from the charge pump, which for most users is more convenient than needing a separate 12V supply.
      The reason for the Python (or the C# program) is to allow your main PC to control the Arduino, and transfer hex files that contain AT89C2051 code, to and from the Arduino. The Arduino sketch doesn’t contain the program (8051 code) for the AT89C2051 – the Arduino, with its sketch, is just a tool for programming the target chip – when you change your AT89C2051 code, there’s no need to alter or reupload the Arduino sketch.

Leave a Reply to cesco Cancel reply

Your email address will not be published. Required fields are marked *