These E-paper displays work well and look nice. At the time of writing you can get the 1.54 – inch size (200 x 200 pixels) from Banggood, but there are other sizes in the same range and my code should work with the bigger ones too. I have one on order to test. Search on eBay for Waveshare E-paper module. I’ve not tried the three colour (black, red, white) modules yet – those will need a tweak to the sketch.
Edit (January 8th) have now received the larger 4.2 – inch 400 x 300 pixel module and this WON’T work with my code without considerable modification. The official Waveshare code doesn’t support partial refresh for this larger module at all. There is a library by ZinggJM on GitHub that does support partial update but warns that it’s not official and could conceivably damage the display. I’ll look at it soon… (end of edit).
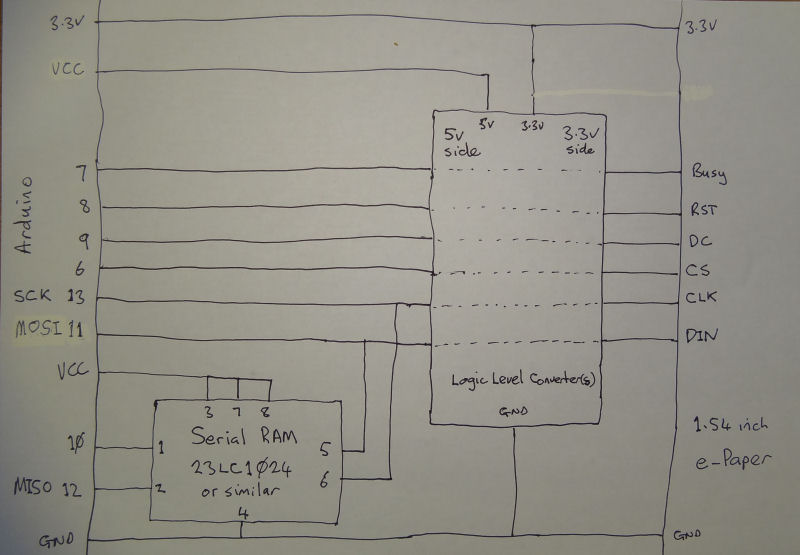
A naked AtMega 328 Arduino doesn’t really have enough RAM to drive these displays properly: even the 1.54 – inch display has a 5000 – byte display area and the display memory is write only. The AtMega 328 only has 2k of RAM so it can’t contain a memory buffer for the full screen and this makes graphics difficult. I overcame this problem by adding a serial RAM chip, 23LC1024, and using that as a paged memory display buffer.
The display is 3.3V device and 5V signals may kill it! Best solution is to use a 3.3V Arduino. You can get the Pro Mini ones that work at 3.3V (and should have an 8MHz crystal). If you’re using a 5V Arduino, make sure to use some voltage level converters – you can get them in four or eight channel versions from Banggood or eBay.
Here’s the circuit.
I’ve attached the sketch. To use the “driver” in your own sketches just copy the ePaper.h and ePaper.cpp files to the same folder as your .ino file. Then you need a
#include “ePaper.h”
in your .ino file which then makes the following commands available:
ePaper::start(); Call from your setup() function before using any other ePaper commands
ePaper::clearBuffer(true); Clears the display buffer to all white. Use false to clear it to all black.
ePaper::displayFrame(); Actually refreshes the display so you can see it. Normally you would do a bunch of other graphics operations (below) to create a display in the buffer before displaying it.
ePaper::text(x, y, “string”, false); Displays string with top left at (x, y) using black text on a white background. Use true to display white text on black background.
ePaper::textSmall(x, y, “string”, false); Same as ::text but using a smaller font.
ePaper::pixel(x, y, false); Draws a black pixel at (x, y). Use true for a white pixel.
ePaper::line(x1, y1, x2, y2, false); Draws a black straight line from (x1, y1) to (x2, y2).
ePaper::rectangle(x1, y1, x2, y2, false); Draws a black rectangle outline using vertical and horizontal lines where (x1, y1) and (x2, y2) are the coordinates of diagonally opposite corners.
ePaper::filledRectangle(x1, y1, x2, y2, false); Same as ::rectangle but the rectangle is solid black (or white if true is used) instead of just an outline.
ePaper::circle(x1, y1, radius, false); Draws a circle outline in black with specified radius centred at (x1, y1);
ePaper::filledCircle(x1, y1, radius, false); Same as ::circle, but filled.
ePaper::fullUpdateMode(); This sets the display so that ::displayFrame() does a complete update – this takes longer and causes the display to “flash”
ePaper::partialUpdateMode(); This sets the display so that ::displayFrame() works faster and without “flashing”. The drawback is that with thousands of updates, perhaps spread over several days, the display isn’t as clear and may show greys in some areas rather than black or white. You should arrange your sketch to switch to fullUpdateMode and then do a displayFrame once occasionally to prevent this from happening. I normally do fullUpdateMode the first time when creating a fresh “page” and then use partialUpdateMode while updating/animating that page.
ePaper::sleep(); This puts the display into very low power mode where the display should not then disappear even if the power is turned off. Recommended that your sketch does this if if doesn’t need to update the display for some time.
ePaper::wake(); Wakes from sleep.
Here’s the sketch: https://ceptimus.co.uk/ePaperDemo.zip
Leave a Reply