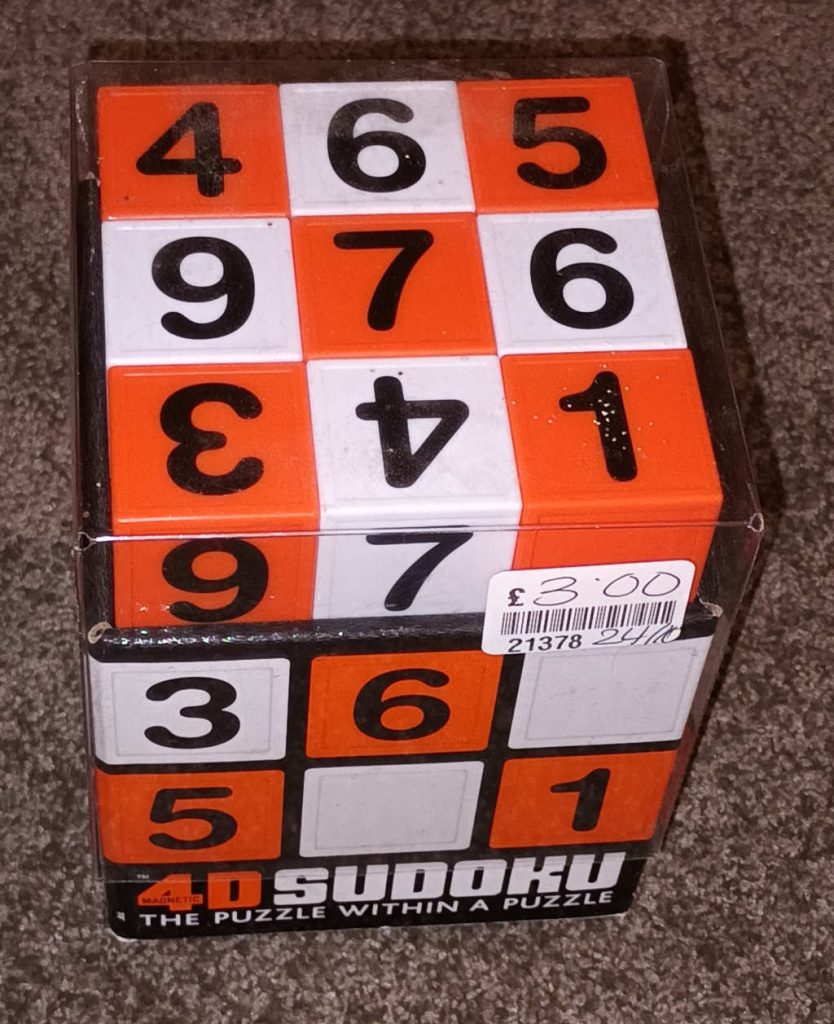
I found this old puzzle in a charity shop.
It’s copyright © 2007/8 www.4Dgames.tv, and also has the URL www.4Dsudoku.net on the box – but neither of those sites seem to exist now.
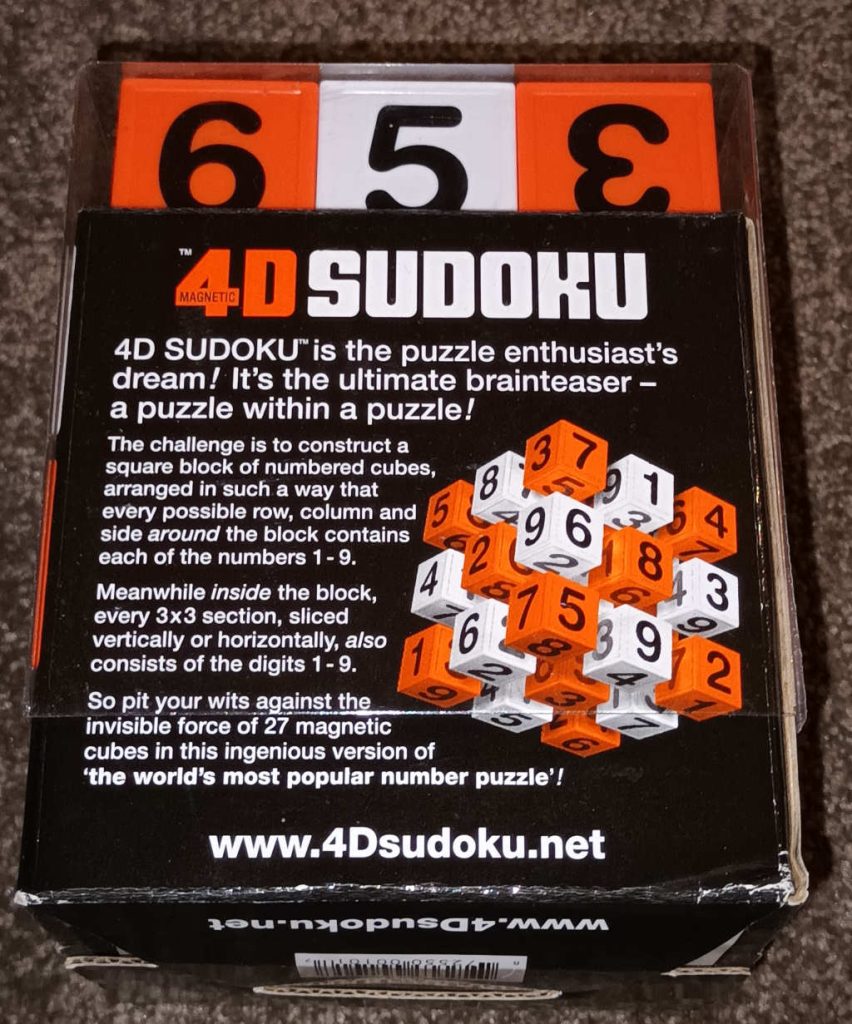
The puzzle consists of twenty-seven cubies, which stick to each other magnetically; there are fourteen orange cubies, and thirteen white ones.
I searched online, and found that Matthew Somerville had blogged about this puzzle, and found a solution using a Python program. But I decided it would be more fun to have a go at it myself, without first looking at his solution.
Spoiler alert! Here’s the solution my program found, and displayed in exploded-3D form: you can twist it around to see all sides of all cubies, and zoom in and out to get a closer look.
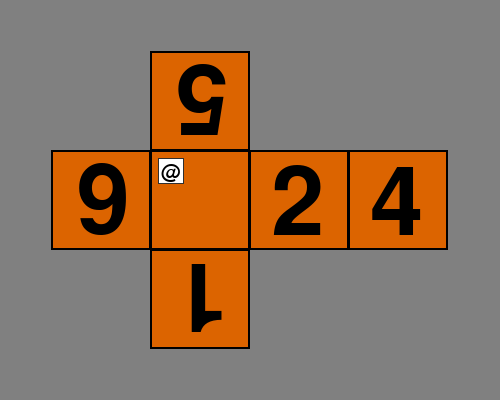
I needed to order the twenty-seven cubies, and enter the data about what numbers are on their faces, and the orientation of those numbers. So I stuck a little sticky label on each cubie, and identified them with the twenty-six letters of the alphabet, plus the @ symbol.
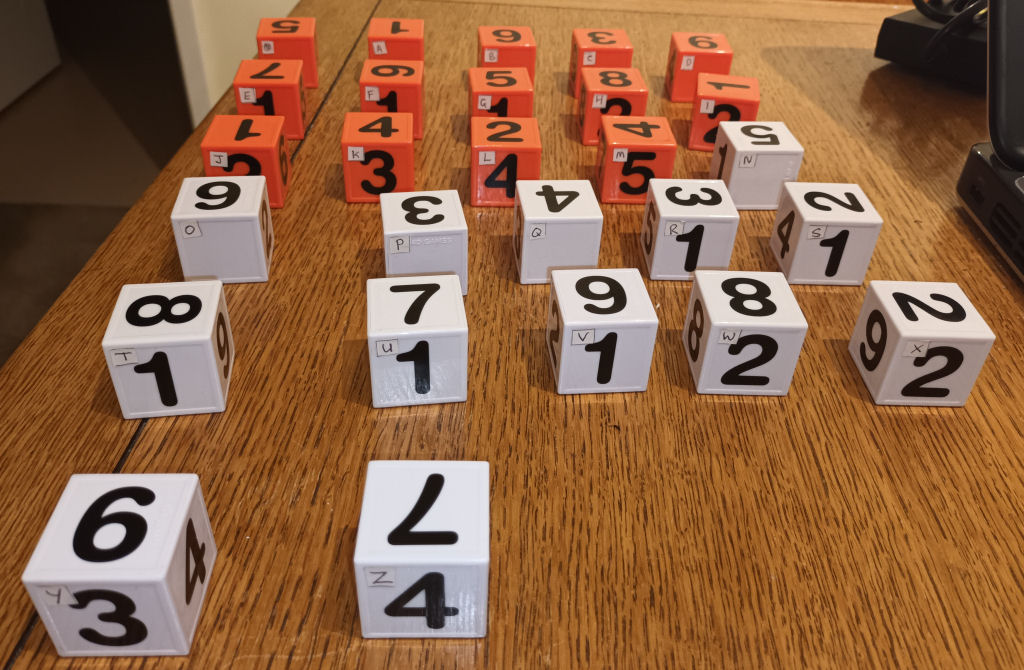
I tried to put them in some sort of sensible order, with the fourteen orange cubies first, low numbers (or one of the nine blanks) facing the front, and the numbers on the front, right, back, and left all upright. The ‘6’ and ‘9’ faces are identical, so in the case of the top and bottom faces (as I’ve placed them) it’s not at all clear whether a face is a ‘6’ or a ‘9’.
I’m a beginner at Python, but I decided to try using it for this project. Now that I’ve solved the puzzle and blogged about it, I shall go and look at Matthew’s code and blog to compare his approach with mine!
So first I defined the twenty-seven cubies, in Python, with my labels. You can see the definition code here. You can see I defined them in sorted order – remember that there are no ‘9’s in the definitions – a ‘9’ is an upside-down ‘6’ – so the order might look a little funky, but that’s because I could see when I was labelling them, whether a ‘6’ was most likely to be a ‘9’ on the front, right, back, and left cubie faces.
And then I used the pygame-ce library, to render each of the cubies in ‘unrolled’ format. I’ve put the first one below; if you want to download all of the unrolled images, you can see them here: unrolled cubie images
To display the cubies and solved cube in a more convenient way, I wanted to use 3D models that can be rotated on-screen by the user, so I installed the CadQuery python library, and rendered the cubies using that. I’ve put the first cubie below, and you should be able to rotate it to view all six sides. If you want to download the models for all twenty-seven cubies, they’re in this zip file. If you do download them, there are lots of free online 3D model viewers, so there’s no need to install anything on your device to view them.
Now I was ready to write the solver. Basically, it uses a recursive search:
- Fit each unused cubie at the first postion (I start at left, bottom front). Try it in all possible twenty-four orientations (four quarter-turn rotations when sitting on each of its six faces).
- For each of those possibilities (27 cubies * 24 orientations) recurse to try the next position. My code does the middle bottom front cubie next, working along each row in the front nine-cubie layer, then the same order on the middle layer, and finally the back layer.
- At each stage, check all the faces external and internal, and don’t go any deeper in the search if there are any problems. Problems are: A) more than one of the same number on a face, except ‘6’ which can occur twice – once for ‘6’ and once for ‘9’; B) a blank on a face, unless all the cubie faces on that same face are blank; C) numbers on a face that aren’t all in the same orientation (special case of ‘6’ can be upside-down for one instance, but the second instance must be the opposite orientation compared to the first); D) because of the chequerboard colouring of the completed puzzle, cubies must be fitted alternating orange and white.
- To avoid trivial rotations of the whole solved cube, the centre ‘core’ cubie of the cube (the fourteenth one to be fitted), which must be white, is only tried in one of its twenty-four possible orientations.
- Even with the core cubie’s orientation locked, a valid solution will still show up as eight trivial variations of each other: once a valid solution is found, you can swap over the left and right layers, and still have a valid solution. Similarly, you can swap the top and bottom layers, and the front and back ones. You can do any combination of the three swaps, giving eight variations in total. To prevent this from happening, my solver locks one of the orange cubies (the ‘@’ cubie) to only be allowed at the left bottom front position, or the centre of the front face – that eliminates seven of the eight possible variations.
Rather to my surprise, once I’d got rid of some bugs, my program found a solution in less than a second of running time, and this on a fifteen-year-old laptop! However, this was something of a fluke. Because of the order I’d labelled the cubies, the very first cubie fitted has a blank front face – so this means all the next eight cubies fitted must have blank front faces. The solver rattles through all the possibilities for those nine cubies, arranging them so that there are no duplicate numbers (except ‘6’) along the right, left, top, and bottom edges of the front face. It’s obvious that the puzzle must be designed with the numbers opposite the blank cubie faces comprising all the digits ‘1’ to ‘9’ or the puzzle wouldn’t be solvable – but my solver doesn’t assume that, and checks anyway.
The second fluke is that the first cubie my puzzle tries, the ‘@’-labelled one, is indeed at a corner in the solution, not the centre of a face. There are eight corner positions and six face centres, so I suppose the odds were in favour of that. Anyway, that means the first cubie the program fits – the ‘@’ cubie – is in a valid position to find the solution.
The third fluke is that in the puzzle solution, the locked position of the core cubie (which turns out to be the ‘Y’ cubie), happens to have its label pointed in the same direction as the ‘@’ cubie. This isn’t as much of a fluke as it sounds, because although my program tries each cubie in twenty-four orientations, really only four of those orientations (with the label always upright) have any chance of forming a solution: with the label upright, the numbers on the front, right, back, and left are also upright. Once a cubie is tipped on its side, or upside-down, then to get all the numbers on the faces oriented the same, you pretty much have to tip all the other cubies the same way. Still, it was a one-chance-in-four fluke.
Anyway, my program doesn’t give up once it finds a solution – it keeps chugging away till it’s exhausted all the possibilities – on the same ancient laptop that takes about an hour, though it would be much faster if I only tried each cubie in the four necessary orientations, rather than all twenty-four. You can interrupt the program, of course, using Ctrl-c after it’s found the first solution – because it turns out that there is only one.
Of course, you can get seven variations of the unique solution the program finds, by swapping over any combination of the front/back, top/bottom, and left/right layers of the solved cube. If you don’t like seeing the blank face on the outside of the solved cube, just swap the layer containing the blanks with the opposite layer, and the blank face will then be hidden inside.
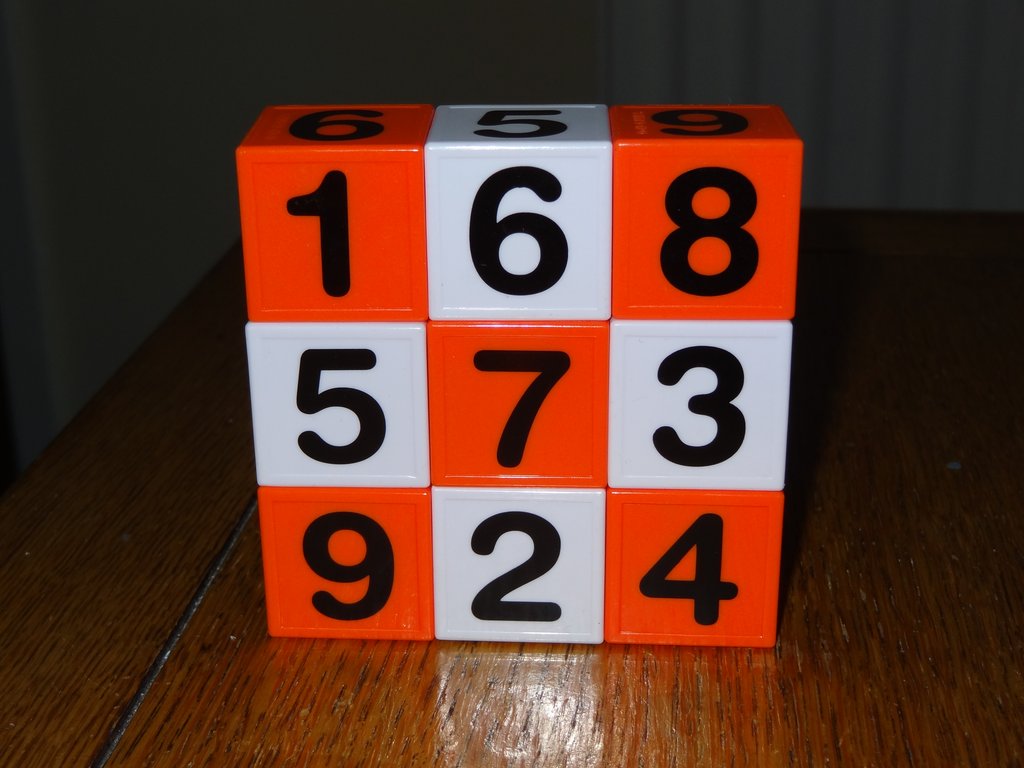
The instruction leaflet mentions that one of the faces of the solved cube will be ‘magic’ – the numbers in its rows and columns all summing to fifteen. It turns out that this face is the one on the opposite side of the blank face – pictured below.
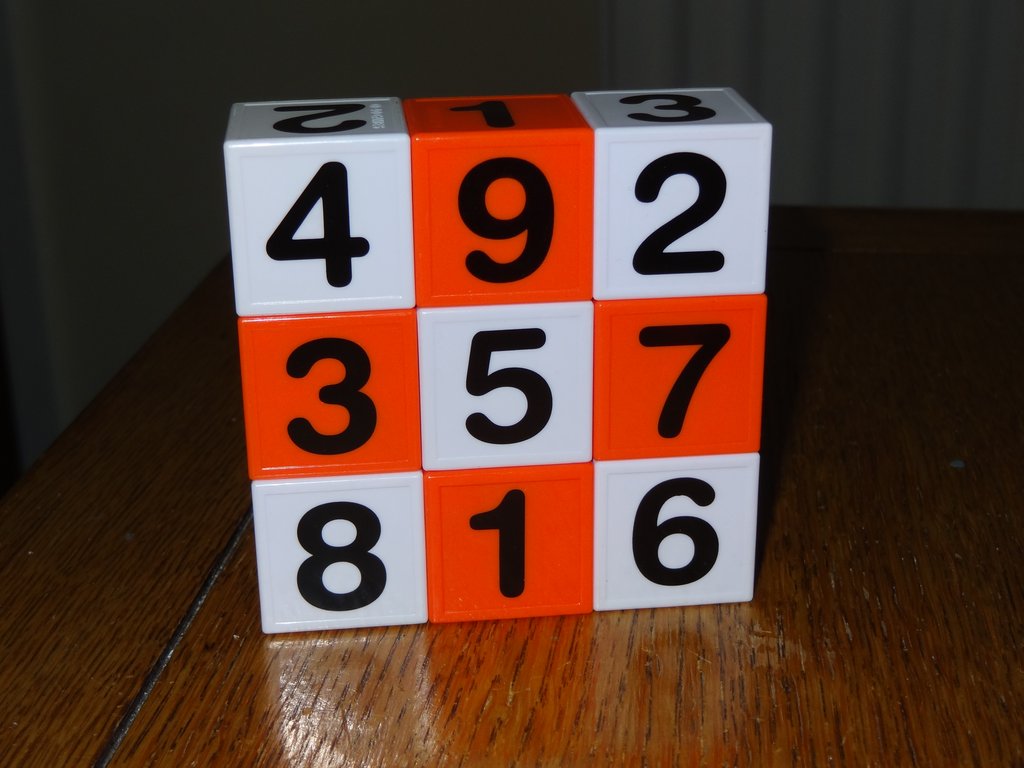
It’s not as magic as it could have been: if the puzzle designer(s) had arranged the numbers on that face as pictured below, then the two diagonals would also have summed to fifteen. I wonder why the puzzle designer(s) chose not to use a fully magic square?
Here is my python program for solving the puzzle. I’ve stripped all the library calls generating the 3D images out of that version, so you can run it in a standard python manner and it just displays a text-based solution of the puzzle.
I’ve now looked at Matthew Somerville’s blog about the puzzle, and his approach was very similar to mine. I’m sure both Matthew and I got much more fun out of this puzzle by coding a solver, than we would have done solving the puzzle by hand. Writing the solver, and wanting to display the puzzle pieces and solved puzzle in 3D form, has also taken me down the rabbit hole of learning a bit about the pygame and CadQuery python libraries – which I think may prove useful for some future projects…
Leave a Reply